How to Set Up Your Restaurant's Google Business Profile

A regular texts you on a Friday night to ask if you're closed, because Google says you shut at 6pm. You search your own restaurant and find a listing you never set up: no photos, the old phone number, and the place down the street sitting right above you in the results. If that moment sounds familiar, your Google Business Profile for restaurants has been working against you, and this guide walks you through fixing it, one field at a time.
Why Your Google Business Profile Matters More Than Your Website
When someone wants dinner, they rarely type in your web address. They search "Thai food near me" or your restaurant's name, and Google answers with your Business Profile: the hours, the photos, the reviews, the address, the button to call. For most diners, that panel is your restaurant. Your website comes second, if they ever click through at all.
That makes your profile the front door. If it's missing, the hungry person searching right now sees someone else. If it's half finished, they see a place that might be closed, might have moved, might not be worth the risk.
Google is open about this. Its own help center says a complete profile makes it easier for customers to find you, and that customers are 70% more likely to visit and 50% more likely to consider buying from a business with a complete Business Profile. Google also states that complete, accurate information helps a listing match more relevant searches. In plain terms: every empty field is a search you could have shown up in and didn't.
The good news is that it costs nothing. You only need an hour, a phone, and the steps below.
Step 1: Claim and Verify Your Restaurant's Google Business Profile
Before you can change anything, Google needs to know the listing belongs to you. That's two jobs: claiming it, then verifying it.
Check whether a listing already exists. Many restaurants have a profile they never created. Google builds them automatically from public data, customer suggestions, and delivery apps. Search your restaurant's name and city on Google Maps. If a listing appears with an "Own this business?" or "Claim this business" link, you need to claim it, not create a new one. Creating a second listing gives you a duplicate, which splits your reviews and confuses customers.
Go to business.google.com. Sign in with a Google account you plan to keep. Use a business email, not a manager's personal Gmail. If that manager leaves, you don't want your listing leaving with them.
Search for your restaurant. Type the name exactly as it appears on your sign. If Google finds your existing listing, select it and follow the prompts to claim it. If nothing comes up, choose the option to add your business and enter the name, the category (more on this in Step 2), and the address.
If someone else already claimed it. Google will show part of their email address and let you request access. The current owner gets a notice and has a set window to respond. If they don't, Google usually gives you the option to claim it yourself.
Pick a verification method. Google decides which options you see based on your category, location, and account history, so you may not get every choice. The common ones:
- Video recording. Now the most common option for restaurants. You record one continuous, unedited clip on your phone showing your street sign or the outside of the building, then walk inside to show the dining room or kitchen, then something that proves you run the place, like unlocking the register or showing a utility bill with the restaurant's name. Google reviews it, usually within about five business days.
- Phone or text. Google sends a code to the number on the listing. Type it in and you're done in minutes.
- Email. A code or link goes to a business email address. Also fast when it's offered.
- Postcard. Google mails a code to your address. It can take a week or two. Don't request a second postcard while waiting, because that cancels the first code.
- Live video call. Sometimes offered when other methods fail. You show the same proof to a Google rep in real time.
Nothing goes live until you're verified. You can fill in fields while you wait, but customers won't see your changes until verification clears. That's why this step comes first. Start it today, then use the waiting time to work through Steps 2 to 4.
Step 2: Fill In Every Business Detail
This is the basic information section. Open your profile, click "Edit profile," and go through it top to bottom. Each field is short, but each one decides whether you show up for a search.
Business name. Use the exact name on your sign and your menu. Nothing more. If you're called Bella Vita, don't enter "Bella Vita Best Italian Restaurant Downtown." Google treats extra words in the name as a guideline violation and can suspend the listing.
Primary category. This is the single most important setting for showing up in the right searches. Pick the most specific option that fits: "Italian restaurant," "Ramen restaurant," "Seafood restaurant," not just "Restaurant." Someone searching "ramen near me" is matched to restaurants whose category says ramen. Start typing and Google suggests options from its list.
Additional categories. You can add more. A pizzeria that also runs a bar might add "Bar." Only add what's genuinely true of the business, and keep the primary category as your main identity.
Address. Enter it exactly as the post office knows it, including a suite or unit number if you have one. Then check the map pin. If it's sitting on the building next door, drag it onto your front door. A wrong pin sends people walking to the wrong entrance.
Service area. Only fill this in if you deliver or cater off-site, and list the towns or neighborhoods you actually cover. A dine-in restaurant with no delivery should leave it blank.
Hours. Enter all seven days, including the ones you're closed. Then use "Special hours" for every holiday, private event, or early close. Wrong hours are one of the most common reasons restaurants get angry one-star reviews: someone drives across town on a Monday and finds a locked door. If your kitchen closes earlier than the bar, or you have separate brunch or takeout hours, add them under "More hours."
Phone number. Use the number someone actually picks up during service. Not the owner's cell that goes to voicemail, not a landline nobody answers after 4pm.
Website. Your own website, if you have one. If you don't, you can leave this blank or link to the page where people order or book. Avoid linking to a social media profile unless it's truly your main home online.
Attributes. These are the checkboxes further down the edit screen: outdoor seating, wheelchair-accessible entrance, takes reservations, good for kids, vegetarian options, free Wi-Fi, dogs allowed, and so on. They look minor. They aren't. When someone filters Google Maps for "outdoor seating" or "wheelchair accessible," these boxes decide whether you appear. Tick every one that's true and leave the rest unticked. Which attributes you see depends on your category, so another good reason to get the category right.
Step 3: Write a Business Description That Actually Helps
The description is the one place on your profile where you get to talk in your own words. Most restaurants either leave it blank or paste in something that could describe any restaurant in any city. Neither tells a hungry stranger why they should pick you tonight.
The rules. You get 750 characters, roughly 120 words. Google shows the first part before a "more" link, so put the most useful sentence first. No links, no phone numbers, no special offers or "20% off" promotions, and no stuffing in keywords. Google can reject descriptions that break these rules.
What to include. Answer the three questions a first-time diner has: What kind of food is this? What's it like inside? What's different here that I won't find down the street? Use details that don't already appear in your hours, address, or attributes. Who cooks, where the recipes come from, what you're known for, how many people the room holds, what the mood is like on a weeknight versus a Saturday.
Here's what the difference looks like. Take a fictional restaurant: Bella Vita, a family-run Italian place.
Weak description:
Welcome to Bella Vita! We are the best Italian restaurant in town, serving delicious, high-quality food made with the freshest ingredients. Our friendly staff and great atmosphere make us the perfect place for any occasion. Come visit us today and enjoy an unforgettable dining experience!
Every sentence in that version could belong to a thousand other restaurants. "Best," "delicious," "freshest," and "unforgettable" are claims, not information. A reader learns nothing they can picture.
Strong description:
Bella Vita is a family-run trattoria on Harbor Street, cooking the food of Abruzzo, the region in central Italy where owner Marco Ferri grew up. Pasta is rolled by hand every morning, and the lamb arrosticini are grilled over charcoal on skewers, the way they're served at village festivals back home. The dining room seats 40, with one long table that works well for birthdays and big family dinners. Weeknights are calm enough for conversation; Fridays and Saturdays get lively. The wine list is short and all Italian, most bottles under $40, and every pasta can be made gluten-free.
That version runs about 590 characters, well under the limit. It names the region, the owner, a signature dish, the room size, the mood, the price point, and a dietary option. Someone reading it knows whether it's right for their Saturday dinner before they ever call.
A quick test. Read your description and ask: could a competitor paste this onto their profile without changing a word? If yes, rewrite it until the answer is no.
Step 4: Add Your Menu
A lot of people decide where to eat by reading the menu first. If yours isn't on Google, they either guess or move on to a restaurant whose menu is right there. Google gives you two ways to add one.
Option 1: Link to your existing online menu. In "Edit profile," find the menu link field and paste the web address of your menu page. Use a real web page if you can, not a PDF. PDFs are slow to open on a phone and hard to read when pinched and zoomed.
Option 2: Build your menu inside Google. Open "Edit profile" and look for "Menu," or "Food menu." The menu editor lets you create sections (starters, mains, desserts, drinks) and add each dish with a name, a short description, and a price. You can also add a photo for individual dishes. This takes longer to set up, but the menu then appears directly on your profile, so customers don't have to leave Google to read it. The editor isn't available in every country or for every restaurant, so if you don't see it, use the link option instead.
Do both if you can. The link catches people who want the full menu with every option. The built-in menu catches people scrolling quickly on their phone.
Keep it current, or take it down. An outdated menu is worse than no menu. A customer who comes in for a dish you dropped last spring, or who sees a price that's $6 higher at the table than on Google, leaves feeling misled. Every time you change the menu in the restaurant, change it on Google the same week.
Watch for menus you didn't add. Google also pulls menus from delivery apps, ordering partners, and photos customers upload of your printed menu. If an old or wrong menu shows up on your profile, the menu editor lets you choose which source Google should display.
Step 5: Upload Your Photos (This Is the One Most Restaurants Get Wrong)
This is the step where a restaurant Google Business Profile either pulls people in or quietly sends them somewhere else. Most owners do it once, in a hurry, with whatever is sitting in their camera roll. Then they wonder why the listing gets views but not visits. Here's how to do it properly.
Where to upload. From your profile, click "Add photo" or go to "Photos" in the edit menu. Google sorts your uploads into categories. Use them, because each one does a different job.
Cover photo. This is the single most important image on your profile. It's the large photo people see in search results and at the top of your listing before they click anything. Make it your best food photo: a signature dish, shot close, in good light. Not the outside of the building. Not your logo. A diner deciding between three places in two seconds is choosing food, so show them food. Google may sometimes display a different image first, but setting a strong cover photo gives you the best chance of controlling that first impression. A wide, landscape-shaped photo works best here, since the cover displays as a wide banner.
Logo. A clean, square version of your logo. It appears as a small circle on your profile, so keep it simple and readable at thumbnail size.
Food and drink. The heart of the profile. Upload your signature dishes, your bestsellers, your desserts, your cocktails. Shoot one dish per photo, plated the way it reaches the table. Skip the half-eaten, messy shots.
Interior. Show the dining room the way a guest sees it when they sit down: tables set, lights on, ideally with a few people in the room so it doesn't look empty. This answers "is this place for a date or for a quick lunch?"
Exterior. Take shots from the street at different times of day, including one at night if you're open for dinner. These help people recognize your door when they arrive, which matters most if you're in a busy street or a shopping center.
Team and at work. A chef plating, a bartender mixing, the owner behind the counter. These are optional, but they make your restaurant feel like real people run it, which is often the deciding factor for a family-run place.
How many photos. Google's own guidance suggests at least three photos in each category that applies to you: three exterior, three interior, three or more of your food and drinks. Treat that as the floor, not the goal. Google has reported that businesses with photos receive noticeably more direction requests and website clicks than those without, and profiles with a steady supply of fresh photos tend to get more views. Aim for 15 to 20 strong photos at setup, then keep adding a few every month.
The technical rules. Use JPG or PNG files between 10 KB and 5 MB. Google recommends at least 720 x 720 pixels, and anything below 250 x 250 gets rejected. Photos should be in focus, well lit, and show your actual restaurant and your actual food. Google's guidelines ask that photos reflect reality, without heavy filters or fake scenes, so stock images and AI-generated food are off the table.
Where most restaurants go wrong. The guidelines above are easy to follow. The hard part is the photos themselves. Most owners upload whatever they shot on their phone between tickets: a plate under yellow kitchen bulbs, dim and flat, the colors slightly off. The dish was beautiful when it left the pass. The photo makes it look tired. And because that photo now sits at the top of your listing, it's the version of your food every searcher sees first.
This is where a tool like Feedtray earns its place in the setup. You upload the phone photo you already have, and Feedtray corrects the lighting, color, and clarity in one click, so the dish looks the way it did on the plate. It works on your real photo of your real food rather than generating a fake one, which keeps you inside Google's photo guidelines. Run your cover photo and your food shots through it before they go up, and the profile looks finished from day one.
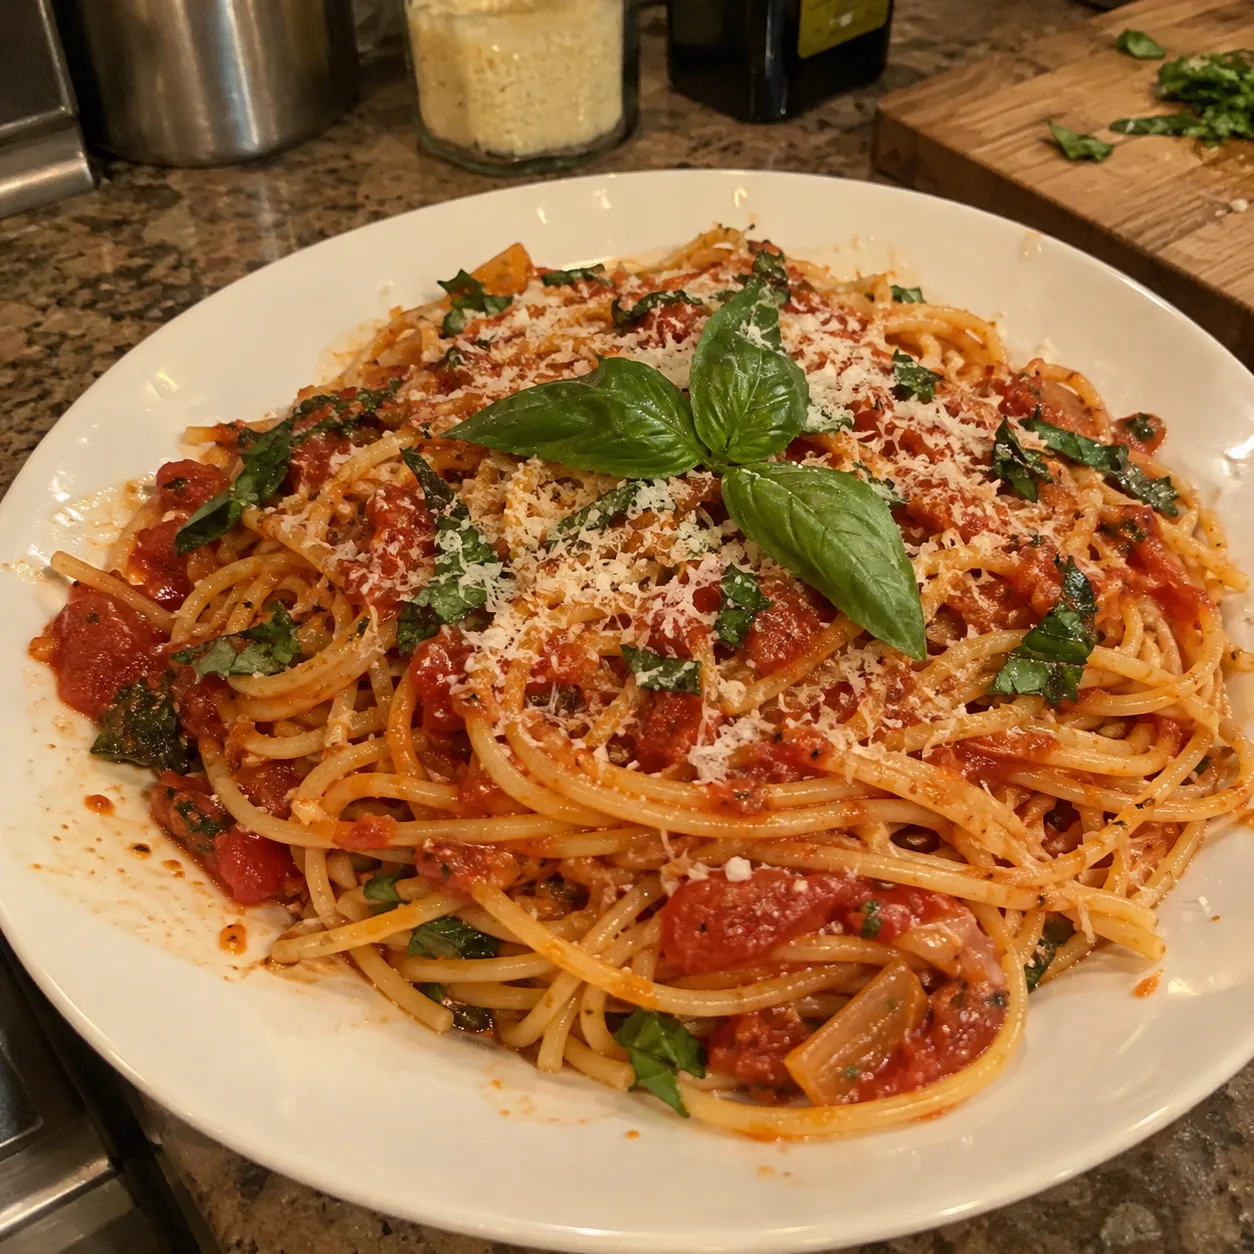
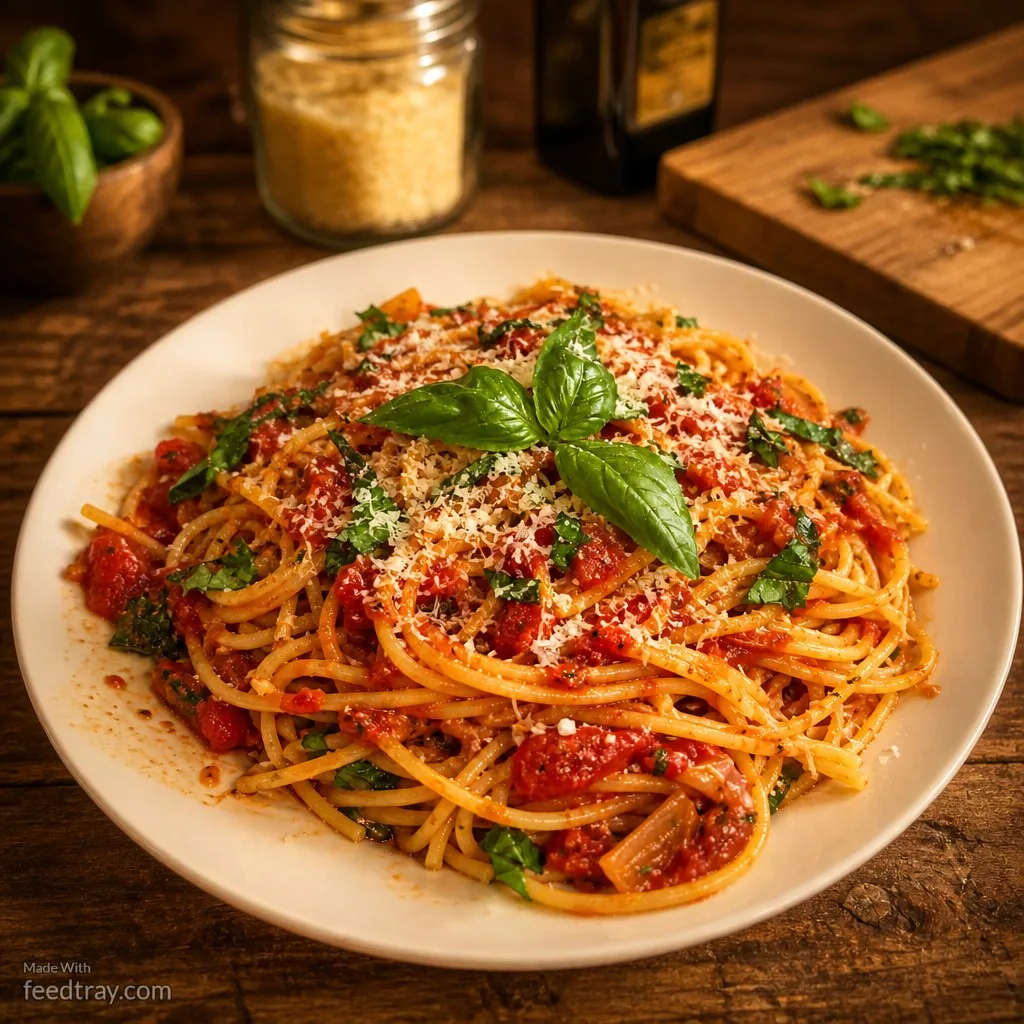
Before and after pasta dish photo enhanced with Feedtray for a restaurant Google Business Profile
If you want to get better at taking the original shots too, the basics of light and angle carry over from social media: see How to Take Better Food Photos for Instagram. And once your photos are up, the full case for why they decide where people eat is in How to Get More Restaurant Customers From Google Maps.
Step 6: Set Up Messaging and Booking
Plenty of people would rather send a message than call, especially for simple questions: "Do you have a high chair?" "Can we bring a cake?" "Is the patio open tonight?" And plenty would rather book a table in two taps than wait on hold during your dinner rush. Your profile can handle both.
Messaging: how it works now. If you set up a profile a few years ago, you may remember a built-in Google chat button. Google retired that feature in 2024. In its place, you can now connect WhatsApp or regular text messaging, so customers tap a Chat button on your profile and the message lands in an app you already use. The button shows up for people searching on their phones.
To turn it on: click "Edit profile," scroll to the Chat section, and click the pencil icon. Choose WhatsApp and paste your WhatsApp click-to-chat link, or choose SMS and enter the mobile number you want texts sent to. Save. Use a number someone checks during service, and only switch this on if you'll actually answer. A message left unread for two days does more damage than no chat button at all. If you don't see the Chat section yet, it may not be available in your country; skip it and make sure your phone number is correct instead.
Booking: add your reservation link. If you take reservations through a platform like OpenTable, Resy, SevenRooms, or similar, copy your restaurant's booking link from that platform. Then in your profile, click "Edit profile," find the Reservations or Bookings link field, paste the link, and save. Google can take a day or two to show it.
Booking: the Reserve with Google button. Some reservation platforms are official Google partners. When yours is, you can connect it so customers see a Book or Reserve a table button and pick a time without leaving Google. The setup usually happens on the reservation platform's side, not in your Google profile, so check your platform's help pages or ask their support team to switch it on. It's worth the five minutes: a diner comparing two places on a Friday afternoon will often pick the one where they can lock in a table right away.
No reservation system? Make sure the "Takes reservations" attribute from Step 2 is set correctly, and that your phone number goes to someone who can take the booking.
Step 7: Ask for Your First Reviews
A profile with zero reviews looks risky, even when every other field is perfect. People trust what other diners say about you far more than anything you say about yourself. Your first ten reviews matter most, and you'll have to ask for them.
Get your review link. In your profile dashboard, look for "Ask for reviews" or "Get more reviews." Google gives you a short link that opens the review box directly. Copy it and keep it somewhere handy.
Ask in person, at the right moment. The best time is right after a guest tells you they loved the meal. A simple line works: "That means a lot. If you have a minute later, a Google review really helps a small place like ours." Train your servers to say it the same way.
Send the link directly. Text or email it to regulars, people who booked online, and anyone who complimented you on social media. A direct link gets far more reviews than "find us on Google."
Put it on paper. Add a line and a QR code to receipts or a small table card, so guests can scan it on their own phone. Two rules from Google here: never offer a discount, free dessert, or anything else in exchange for a review, and don't set up a tablet or "review station" in the restaurant for people to use on the spot. Both break Google's policies and can get reviews removed.
Reply to every review. Thank people for the good ones by name, and mention something specific they wrote about. Reply to the bad ones calmly and quickly. Google encourages owners to respond, and an active, responsive profile shows both Google and future customers that someone is paying attention.
How to answer a bad review without making it worse. Say a guest writes: "Waited 50 minutes for our mains and nobody told us why. Food was cold when it finally came." Don't argue, don't make excuses, and don't share details about their visit. Try this:
Hi Sarah, I'm sorry, a 50-minute wait with no explanation isn't the experience we want for anyone, and cold food on top of that is on us. We were short in the kitchen that night, but that's our problem to solve, not yours. I'd like the chance to make it right. If you're willing, please call and ask for Marco, the owner.
It's short, it owns the mistake, and it moves the conversation offline. The next person reading it sees an owner who cares, which often counts for more than the complaint itself.
Keep It Updated or It Works Against You
A finished profile that goes stale is almost as bad as an unfinished one. Holiday hours that were never changed send people to a locked door. Photos of the old dining room confuse guests who walk into the renovated one. A menu with last year's prices makes the bill feel like a bait and switch. Every one of those becomes a one-star review.
The upkeep is small. Put these on the calendar:
- Before every holiday: set Special hours for Christmas, New Year's, Easter, national holidays, and any private events or early closes.
- Every month: add three to five new photos, especially new dishes and seasonal specials. Reply to any reviews you missed.
- Every menu change: update the Google menu and prices the same week the printed menu changes.
- Every few months: search your restaurant on your phone and look at the listing as a stranger would. Google sometimes accepts edits suggested by the public, so check that your hours, phone number, and category are still what you set.
Twenty minutes a month keeps your Google Business Profile doing its job instead of quietly undoing it. And that small habit is what turns a one-afternoon setup into something much bigger.
Most marketing stops working the day you stop paying for it. Your Google Business Profile setup is different. Do it properly once, keep it current, and it works every lunch and dinner service for as long as you're open, putting your food, your hours, and your reviews in front of people who are hungry and nearby right now. Every guest who finds you that way is a customer you didn't have to buy an ad to reach, and the profile gets stronger with every photo and review you add.